Dies ist eine alte Version des Dokuments!
Inhaltsverzeichnis
Exampes
EAN check
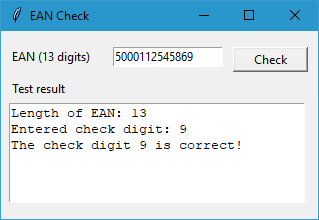
The EAN check is an example of a simple GUI application. It has an entry component for entering an EAN and a text component for the multi-line output of results.
This event method is programmed for the „Check“ button:
def bCheck_Command(self):
    # Input
    EAN = self.EANTV.get()
    # Processing
    if not EAN.isdigit():
        self.output('An EAN must not contain any characters from digits!')
    if len(EAN) == 13:
        self.output('Length of EAN: 13 ')
        self.output('Entered check digit: ' + EAN[12])
        sum = 0
        index = 0
        factor = 1
        while index < 12:
            sum = sum + int(EAN[index])*factor
            index = index + 1
            if factor == 1:
                factor = 3
            else:
                factor = 1
        if sum % 10 == 0:
            calculatedCheckDigit = 0
        else:
            calculatedCheckDigit = 10 - sum % 10
        if int(EAN[12]) == calculatedCheckDigit:
            self.output('The check digit ' + EAN[12] + ' is correct!')
        else:
            self.output('The entered check digit ' + EAN[12] + ' is incorrect!')
            self.output('The correct check digit is ' + str(calculatedCheckDigit))
    else:
        self.output('The entered EAN has ' + str(len(EAN)) + ' digits!')
        self.output('It must consist of 13 digits.')
According to the IPO principle, the input from the entry component is read in first. The text variable EANTV assigned to the entry component is used for input or output. Its value can be read with ENATV.get() for input and with EAN.set(value) for output. With
EAN = self.EANTV.get()
the EAN entered in the Entry component is read into the local variable EAN of type str(ing) and can then be processed.
The processing part checks whether 13 digits have been entered and then performs the check digit calculation.
Outputs are made to the text component labeled Output. It has very powerful methods, so even just outputting a line isn't quite easy. A separate method output() is therefore used in order to simplify programming.
def output(self, line):
    self.Output.insert('end', line + '\n')
This inserts a line at the end of the text component Output and ends it with the control character '\n' (NewLine). If an output line consists of several substrings, these must be put together with „+“. Numbers must first be converted into a string using str().
Download:
Car
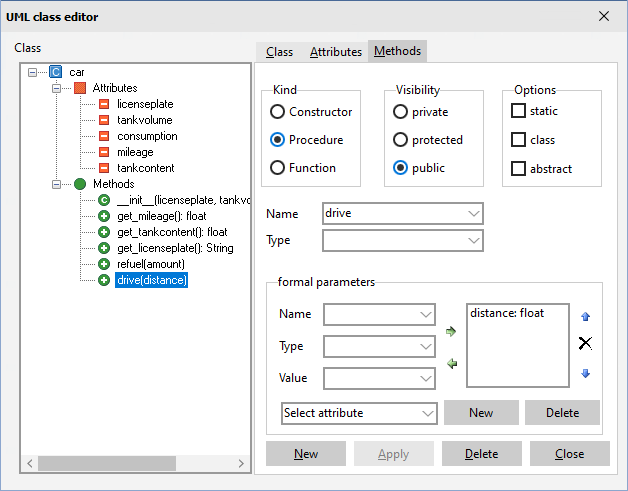
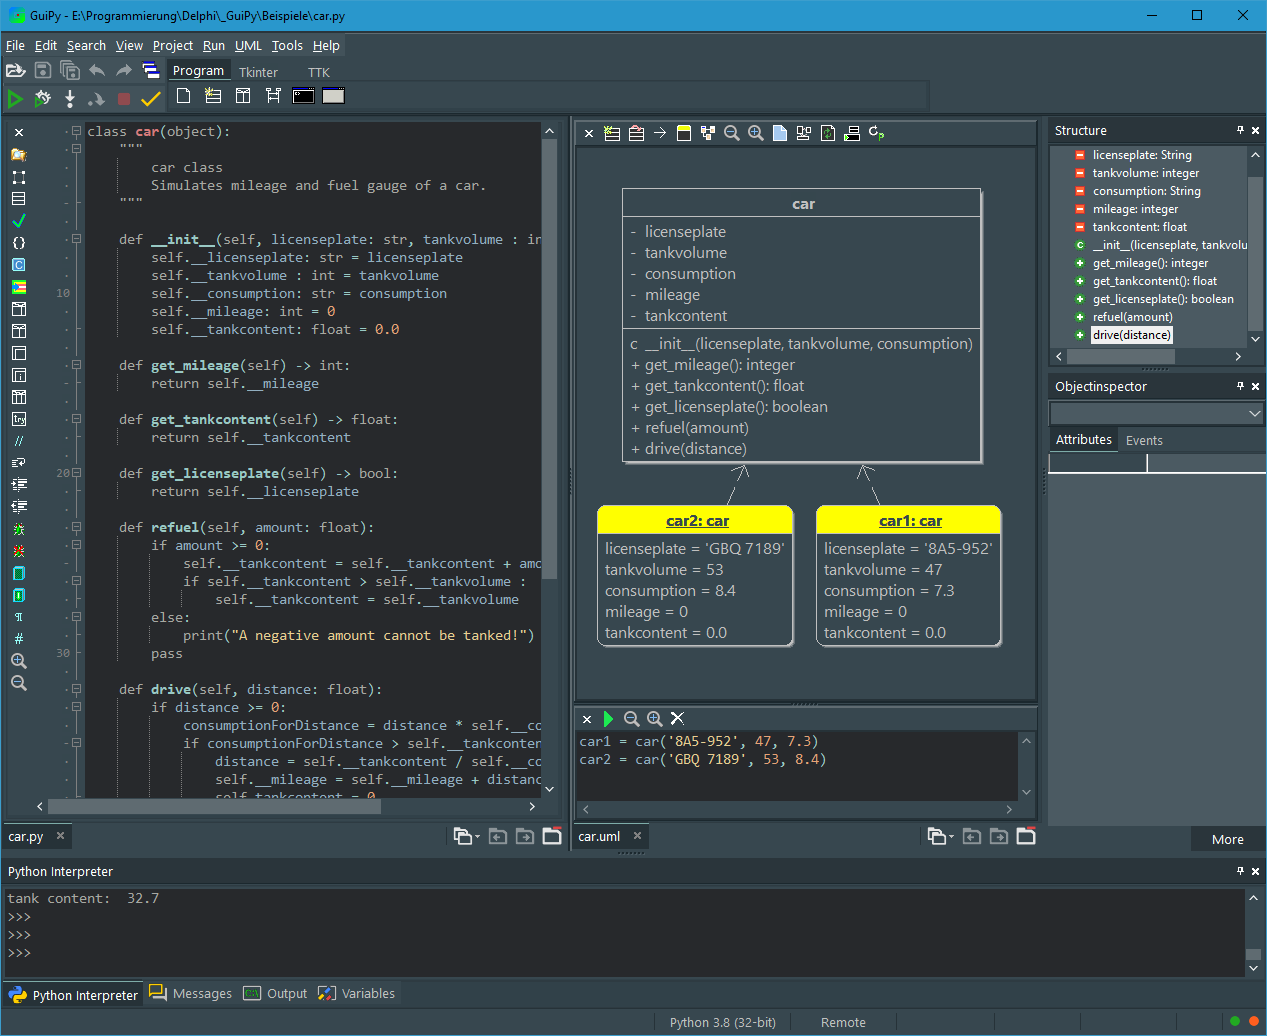
This example is suitable for the introduction to object-oriented programming. Fuel gauge and mileage of a car are modeled. The actual modeling takes place with the class modeler. The license plate is not absolutely necessary, it is used to make it easier to distinguish between cars and to use another data type.
The result can be tested interactively in the UML window. The students understand the difference between the concepts class and object.
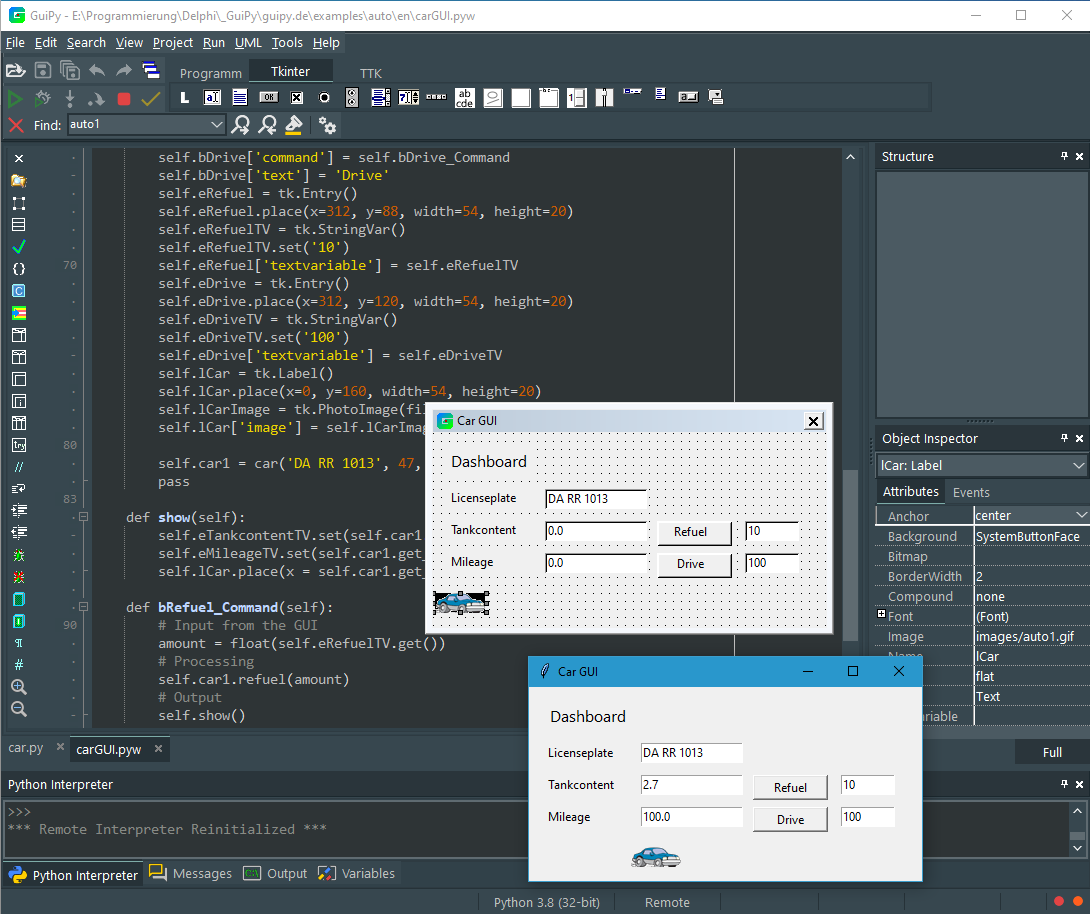
In the next step, the car class is used as a functional spezification in a GUI program.
The GUI program uses the car class. To do this, it must be imported. A car is created and provided as attribute car1 of the GUI class for further use.
    from car import *
      ...
      self.car1 = car('DA RR 1013', 47, 7.3)
When refueling, the quantity entered in the entry component is read in via the get() method of the text variable eRefuelTV belonging to the component and converted into the required data type using float.
    def bRefuel_Command(self):
        # Input from the GUI
        amount = float(self.eRefuelTV.get())
        # Processing
        self.car1.refuel(amount)
        # Output
        self.show()
Then, according to the IPO principle, the entered amount is processed in the refuel() method.
Finally, the result is output with a separate method show(). The values for tank contents and mileage are retrieved via the get() methods get_tankcontent() and get_mileage() of the class car and passed to the set() methods of the text variables eTankcontentTV and eMileageTV:
    def show(self):
        self.eTankcontentTV.set(self.car1.get_tankcontent())
        self.eMileageTV.set(self.car1.get_mileage())
        self.lCar.place(x = self.car1.get_mileage(), y = 160)
The label component lCar has been assigned a car image via the Image attribute in the object inspector. The place() method sets the x position of the car to the mileage.
Download
Linked List
Die Programmierung dynamische Datenstrukturen stellt eine erhebliche Herausforderung dar, denn man muss das Konzept der Verkettung mittels Verweisen verstehen und komplexe Operationen mit Verweisen druchführen. Neu dabei sind Variablen die Werte haben, welche Verweise auf Objekte bzw. Adressen sind.
In diesem Beispiel betrachten wir eine einfach verkettete lineare Liste. Die Liste selbst wird als Klasse VerketteteListe modelliert mit Knoten als Listenelementen. Als Attribut hat sie einen Verweis auf den Anfang der Liste.
Die Klasse Knoten kann im ersten Attribut Daten speichern kann und im Attribut Nächster den Verweis auf einen nächsten Knoten der verketteten Liste. Hat ein Knoten keinen nächsten Knoten, so erhält dieses Attribut den Wert None.
class Node:
    def __init__(self, data):
        self.data = data
        self.next = None
Die Implementierung einer Einfügeoperation ist schwierig, weil vier Fälle zu unterscheiden sind:
- Die Liste ist leer.
- Es soll am Anfang eingefügt werden.
- Es soll am Ende eingefügt werdenn.
- Es soll zwischen zwei Knoten eingefügt werden.
Die beiden ersten Fälle lassen sich mit der Methode einfügen_AmAnfang() implementieren:
    def insert_first(self, node):
        node.next = self.head
        self.head = node
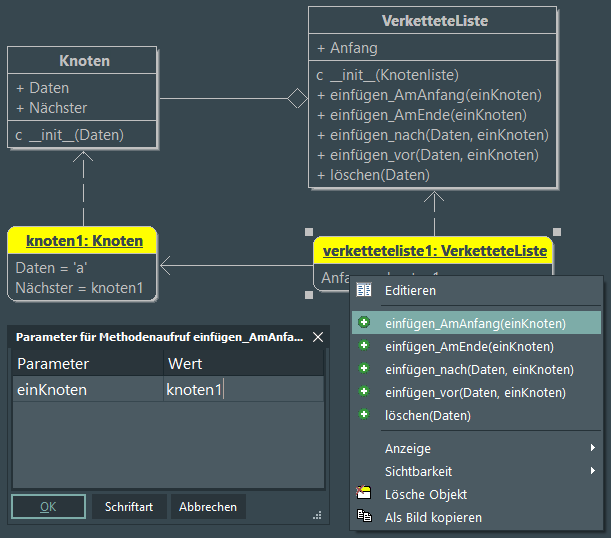
Im UML-Fenster lässt sich die Implementierung testen. Dazu erzeugt man eine verkettete Liste und einen Knoten, ruft über das Objekt verketteteliste1 die Methode einfügen_AmAnfang() auf und gibt für den Parameter einKnoten den Wert knoten1 an.
Zum Einfügen am Ende der Liste muss man sich mit einer Schleife und einer Cursor-Variablen zum letzten Element durchhangeln. Dort wird der neue Knoten angefügt.
    def insert_last(self, node):
        if self.head is None:
            self.head = node
        else:
            cursor = self.head
            while cursor.next is not None:
                cursor = cursor.next
            cursor.next = node
Am schwierigsten ist das Einfügen vor einem Knoten, denn der neue Knoten muss dann hinter dem vorhergehenden Knoten eingefügt werden. Neben dem Cursor braucht man dazu einen weiteren Verweise auf den vorherigen Knoten. Der Knoten vor dem einfügt werden soll wird durch seine Daten bestimmt.
    def insert_before(self, data, new_node):
        if self.head.data == data:
            self.insert_first(new_node)
            return

        prev_node = self.head
        cursor = prev_node.next
        while cursor is not None and cursor.data != data:
            prev_node = cursor
            cursor = cursor.next
        if cursor is not None:
            new_node.next = cursor
            prev_node.next = new_node
        else:
            raise Exception("Node with data '%s' not found" % data)
Vergleichbar schwierig ist das Löschen eines Knotens, denn zum Löschen muss der vorherige Knoten mit dem nachfolgenden verbunden werden.
    def remove(self, data):
        if self.head.data == data:
            self.head = self.head.next
        else:
            prev_node = self.head
            cursor = prev_node.next
            while cursor is not None and cursor.data != data:
                prev_node = cursor
                cursor = cursor.next
            if cursor is not None:
                prev_node.next = cursor.next
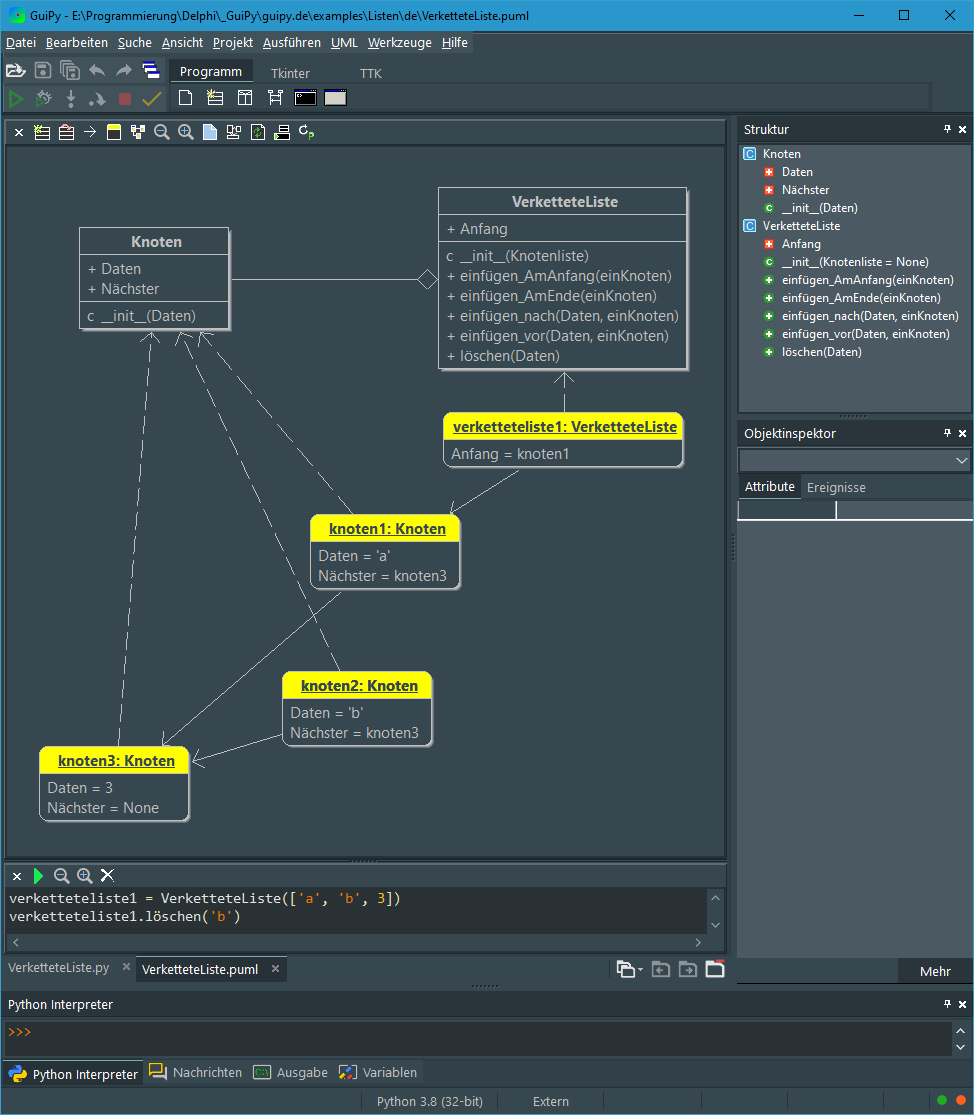
Durch interaktives Testen im UML-Fenster kann man die Funktionsfähigkeit der implementierten Methoden sehr gut prüfen, denn das Ergebnis wird unmittelbar im Objektdiagramm visualisiert. Man erkennt sofort, ob eine Methode wie gedacht funktioniert hat. Im Bild wurde zum Testen der löschen()-Methode die Liste mit den Elementen 'a, 'b' und 3 erzeugt und dann der Knoten mit Daten = 'b' gelöscht. Das hat funktioniert, denn die Liste besteht nur noch aus den beiden Elementen 'a' und 3.
Download:

